Well, when I first began my blog I started talking about my kitchen cabinets and how I managed to update the look and bring them new life for only $100. My husband swore that this was impossible to do and I am here to tell you that it IS possible! With the right materials, some time, and a smidge of elbow grease, you can have this look (or a different one) too.
I searched and searched until my fingers were going numb from typing. My bleary eyes were seeing the same DIY's over and over. Most of them were from contractors who, in my opinion, wanted your business. Then I came across a woman who used this miracle product that did exactly what I wanted it to do...rest more on top of the wood rather than penetrate it deeply. It's almost a cross between a stain and a paint. What is this said miracle product? General Finishes Gel Stain. I used the Java but there are a few other colors available as well.
At the time, this was hard to find. I called several hardware stores and finally found it in a small store about 25 miles away. It was worth the trip for me.
Now I'm going to tell you how I did it!
Supplies:
- a Dual Angle Sanding Sponge
- General Finishes Gel Stain (two pints did the entire job for me)
- a pack of Paint Sponges
- a pack of knobs and drawer pulls (a big pack from Home Depot was only ($20)
- a can of spray paint to match the knobs
- a piece of cardboard
- drop cloth
- a can of Minwax Fast-Drying Polyurethane
- 120-grit sand paper
- masking tape
- a Sharpie
- a bottle of Citristrip
- an old rag or small towel
Tools:
- Screwdrivers (for the hardware)
- Drill (to ADD hardware if you don't already have it)
- Electric Sander
- First, remove all the doors, drawer fronts and hardware (we didn't have any hardware aside from hinges).
Remove all doors, drawer fronts, hardware (if any), hinges, and any little hidden attachments inside the doors. I marked each door and drawer front with a number on a piece of masking tape and a matching number on a shelf in each cabinet so I would remember which door went where.
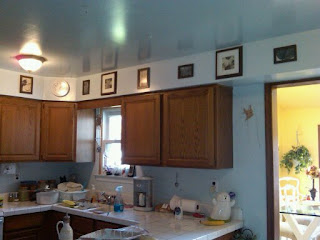 |
| As you can see, we had the standard boring oak cabinets with no hardware and little life |
FIRST THINGS FIRST - REMOVE ALL CONTENTS OF YOUR CABINETS! :)
This is the part that requires the elbow grease - Get your Dual Angle Sanding Sponge and sand, sand sand!!! Our cabinets have a raised panel so i had to get the sander edge in that crevice. I took each door out (one at a time in case it rained) and sanded lightly to scuff up the surface (front and back) to allow penetration of the new color. This is probably the most important step of the whole process. If you do not sand it, it will not work.
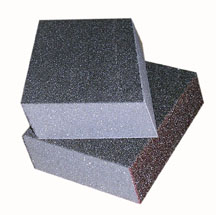 |
| Dual Angle Sanding Sponge |
Next get out your sandpaper and electric sander and sand down the frame and the fronts of the shelves. (I did not stain the insides of the cabinets. I left them the way they were since everything would go back in there and cover it all up anyhow.)
We borrowed a sander and if you don't have one, this can also be done with the sanding sponge. The outer sides of ours was veneer with a matching 'oak' contact paper type on the outer layer. Honestly, we sanded that too. Same with the veneer on the back of the island. It worked out well.
Once every inch of wood is sanded, it's time to get messy. Make sure you have plenty of space to lay out each door and drawer front. If you have space in a garage, that is ideal to protect from the sun or rain.
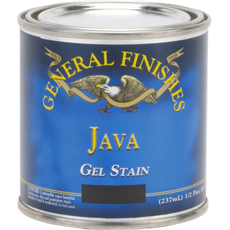 |
| BEST INVENTION EVER! |
Get out your drop cloth and put a few doors on it. Space them out so you have room to work. Using a large paint sponge and your Gel Stain, paint a layer of gel stain on the side facing up. Let them dry COMPLETELY (or else you'll permanently have your fingerprints as part of your home) before flipping them over to do the other side. Don't forget to keep the masking tape label by the door or drawer so you still know where it goes. One coat did the trick for me! This stuff is a gloppy mess. Be careful!
 |
| Paint Sponges |
While the doors and drawers are drying, you can work on staining the frame.
If you managed to get this sticky mess on anything, I can honestly say that the best product to get this off (of flooring, hands, etc) is Citristrip. I am not typically the 'organic' mom but considering I was already working with harsh chemicals and their odors, I wanted something that wouldn't damage my new floor if needed there. It really worked well too.
I had brass hinges and nickel hardware. So, I took the hinges and laid them out and sprayed them to match the hardware with metallic spray paint. I liked the 'hammered' finish so that's what I went with. But the possibilities are endless. Don't forget to spray the screw heads too. Poke them into a piece of cardboard (so they are all facing up) and spray them.
Once all the wood doors, drawer fronts and frame are dry, they can be coated with the Fast-Drying Polyurethane. This offers a durable finish that allows the cabinets to be wiped with a sponge to clean them when something spills. Use a clean paint sponge to apply it.
Finally, if you are adding hardware when no handles existed in the first place, then you'll need a drill and the new hardware. Choose the right size drill bit to accommodate the hardware. Place a piece of masking tape over the spot and mark the spot on that. This will alleviate splintering of the wood and make for a smoother hole. NOTE - BEFORE YOU DRILL, MAKE SURE THE HINGE HOLES ARE ON THE CORRECT SIDE FOR REHANGING. I made that mistake with one of the doors and ended up with a hole in the upper corner instead of the bottom corner of one of the doors. LOL (a little wood putty and a splotch of the stain and varnish quickly covers this up). Attach your hardware and you're ready to rehang all your doors! I simply reused the hinges and painted them so I wouldn't have to worry about the holes lining up.
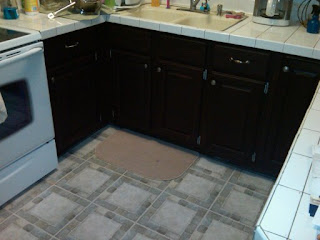 |
| Please don't laugh at my old floor. This has since been replaced. But the cabinets look great! |
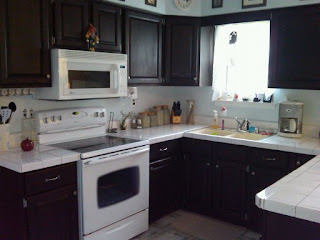 |
| This is the old counter before we replaced it. But the cabinets look great - right? :) |


